Archivi tag: lucid lynx

Screen resolution, VGA and HDMI on Sony Vaio VPCS11E7E with Ubuntu 10.04 (no bed of roses)

Italiano | English

UPDATE (08-30-2010): To bring TTYs back and set boot resolution, click here.

Have you succeeded in installing Ubuntu 10.04 on your Vaio? Good, now let’s deal with screen resolution and shit like that (OMG, not my politeness day!). I know that installing NVIDIA proprietary driver and manually modifying xorg.conf works, but I don’t know if NVIDIA drivers are really required. If you wish to keep nouveau drivers read this post and use it your way.

Install NVIDIA drivers by SystemAdministrationHardware drivers and when you’re asked to reboot don’t do it.

Open a terminal and type

gksu gedit /etc/X11/xorg.conf

and add lines 14 and 15 to that file, like this

Section "Screen"
Identifier      "Default Screen"
DefaultDepth    24
EndSection

Section "Module"
Load    "glx"
EndSection

Section "Device"
Identifier      "Default Device"
Driver  "nvidia"
Option  "NoLogo"        "True"
Option  "ConnectedMonitor"      "DFP-0,DFP-1,CRT"
Option  "CustomEDID" "DFP-0: /proc/acpi/video/IGPU/LCD0/EDID"
EndSection

What do those lines do?

  1. line: configures 3 possible monitors (DFP-0, DFP-1 e CRT).
  2. line: tells your graphic chip your monitor specifications (DFP-0) from an EDID generated by ACPI.

Now you can reboot and enjoy your VGA and HDMI (the latter sadly without sound at the moment).

Side effects

You will lose you virtual consoles. Well, actually they are still there, but when you switch to one of them your screen will shut down. You could try, CTRL+ALT+F1 (CTRL+ALT+F7 brings your desktop back). This is really annoying, but my eyes tell me it’s better than a wrong resolution.

This is energy saving on Linux 😀

Nothing I’m aware of at the moment. This guide continues here.

Sources: obviously vaio-f11-linux, can’t remember the others.

Install Ubuntu 10.04 on Sony Vaio VPCS11E7E

Italiano | English

First things first, let’s install Ubuntu. Insert your CD, DVD, whatever and at this screen

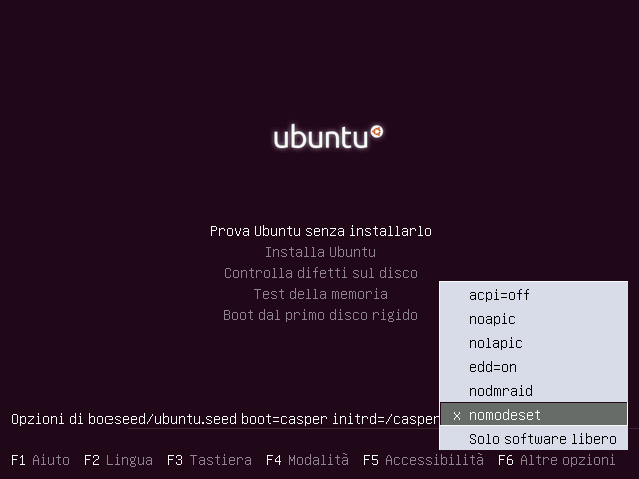
press any key to get the old language choosing menu. Select your language and press F6. In this menu select nomodeset, as in the following image.

Tell Ubuntu to start in live desktop mode (first option) and start the installer as you usually do. Your screen resolution will be just wrong, but it doesn’t matter right now.

Once installation has completed, do not restart your PC, you must first disable KMS on your brand new Ubuntu. In a terminal run

sudo -s
mount /dev/[partizione_dove_avete_installato_ubuntu] /mnt
echo options nouveau modeset=0 > /mnt/etc/modprobe.d/nouveau-kms.conf

Now you can reboot and your Ubuntu will start correctly. Except for the resolution, but this will be the topic of the next howto.

Source: https://wiki.ubuntu.com/X/KernelModeSetting

Installare Ubuntu 10.04 su un Sony Vaio VPCS11E7E

Italiano | English

Cominciamo dalla base, installare Ubuntu. Inserite il CD (o chiavetta che sia) e alla schermata

premete un tasto qualunque e vi apparirà il vecchio menù di selezione della lingua. Impostate la vostra lingua preferita e premete F6 per le altre opzioni. Selezionate nomodeset, come nell’immagine seguente.

Selezionate l’avvio live e cominciate l’installazione come di consueto. Noterete che la risoluzione è completamente sballata, ma per ora non è importante.

Al termine dell’installazione non riavviate il sistema, dovrete prima disabilitare il KMS nell’installazione appena effettuata. Aprite un terminale ed eseguite i seguenti comandi:

sudo -s
mount /dev/[partizione_dove_avete_installato_ubuntu] /mnt
echo options nouveau modeset=0 > /mnt/etc/modprobe.d/nouveau-kms.conf

Ora potete riavviare, e la vostra Ubuntu si avvierà correttamente. La risoluzione sarà sempre sballata, ma questo problema lo risolveremo nella prossima guida.

Fonte: https://wiki.ubuntu.com/X/KernelModeSetting