Archivi tag: vaio

Risoluzione VPCS11E7E e Ubuntu 10.10

Italiano | English

Il problema che abbiamo con Maverick è che i driver Nvidia inclusi non sono in grado di caricare un file EDID esterno. Per ovviare a questo problema installiamo gli ultimi driver, attualmente i 270.18.

sudo-add-apt-repository ppa:ubuntu-x-swat/x-updates
sudo apt-get update

Ora installiamo tutti gli aggiornamenti e seguiamo la guida per la 10.04.

I driver 270.18 rilevano correttamente lo schermo del Vaio, così come la VGA e l’HDMI. Per rimettere a posto la risoluzione in Plymouth, seguite questa guida.

Sony Vaio VPCS11E7E, NVIDIA e maverick

AGGIORNAMENTO (18/10/2010): Evitate l’aggiornamento, il changelog da il problema come risolto, ma non è risolto un accidente. Anzi, le schede come la 310M sono addirittura state tolte dall’elenco di quelle supportate. Aspettate ad installare maverick, o qualunque altra distro con xorg 1.9.

AGGIORNAMENTO (13/10/2010): Rilasciati i 260.19.12 stabili e il changelog promette molto bene!

Questa release mi sta facendo diventare scemo. Giusto oggi hanno aggiornato i driver NVIDIA alla versione 260.19.06, e ovviamente non poteva andare tutto liscio.

I nuovi driver hanno problemi a rilevare correttamente gli EDID caricati a mano, pertanto lo schermo del nostro Vaio diventa inutile (come con i nouveau, per intenderci). I dettagli li trovate nel link a fondo pagina.

L’unica banale soluzione che ho trovato al momento, è rimanere coi vecchi driver 256.nonhovogliadiguardarci, che trovate qui:

http://dl.dropbox.com/u/737114/vpcs11e7e/nvidia-current_256.53-0ubuntu3_amd64.deb

http://dl.dropbox.com/u/737114/vpcs11e7e/nvidia-settings_256.53-0ubuntu1_amd64.deb

A 32 bit non li ho.

Fonte: http://www.nvnews.net/vbulletin/showthread.php?t=155218

Bring TTYs back and Plymouth resolution on Sony Vaio VPCS11E7E with Ubuntu 10.04

Italiano | English

My bad, I’m in the habit not to read articles to the end.

In a terminal

sudo apt-get install v86d

then open /etc/default/grub and edit GRUB_CMDLINE_LINUX_DEFAULT and GRUB_GFXMODE as follows

GRUB_CMDLINE_LINUX_DEFAULT="quiet splash nomodeset video=uvesafb:mode_option=1360x768-24,mtrr=3,scroll=ywrap"
...
GRUB_GFXMODE=1360x768

then

echo uvesafb mode_option=1360x768-24 mtrr=3 scroll=ywrap | sudo tee -a /etc/initramfs-tools/modules
echo FRAMEBUFFER=y | sudo tee /etc/initramfs-tools/conf.d/splash
sudo update-grub
sudo update-initramfs -u

Thus the Ubuntu logo at boot will be at the correct resolution and you will have your TTYs back.

This guide is almost a copy and paste of the link you find in source at the bottom. If you don’t have a VPCS11E7E use that link instead of this guide.

Source: http://idyllictux.wordpress.com/2010/04/26/lucidubuntu-10-04-high-resolution-plymouth-virtual-terminal-for-atinvidia-cards-with-proprietaryrestricted-driver/

Riottenere le TTY e aggiustare Plymouth su Sony Vaio VPCS11E7E con Ubuntu 10.04

Italiano | English

Colpa mia che non leggo mai fino in fondo un articolo, era tutto spiegato.

Aprite un terminale e digitate

sudo apt-get install v86d

dopodiché aprite il file /etc/default/grub e modificate le opzioni GRUB_CMDLINE_LINUX_DEFAULT e GRUB_GFXMODE come segue

GRUB_CMDLINE_LINUX_DEFAULT="quiet splash nomodeset video=uvesafb:mode_option=1360x768-24,mtrr=3,scroll=ywrap"
...
GRUB_GFXMODE=1360x768

nel terminale di prima (se l’avete chiuso apritene un altro) digitate

echo uvesafb mode_option=1360x768-24 mtrr=3 scroll=ywrap | sudo tee -a /etc/initramfs-tools/modules
echo FRAMEBUFFER=y | sudo tee /etc/initramfs-tools/conf.d/splash
sudo update-grub
sudo update-initramfs -u

In questo modo la scritta “UBUNTU” all’avvio sarà alla giusta risoluzione e riavrete le console virtuali (TTY).

Questa guida è stata copiata, tradotta e adattata dal sito che trovate nelle fonti a fine post.

Note

Questa guida è adattata al VPCS11E7E per ottenere nella maniera più veloce una configurazione funzionante. Se utilizzate un altro PC, siete pregati di installare anche questo pacchetto

sudo apt-get install hwinfo

e di controllare le risoluzioni supportate tramite

sudo hwinfo --framebuffer

infine, se necessario, aggiustate la risoluzione in base alle vostre esigenze 🙂

Fonte: http://idyllictux.wordpress.com/2010/04/26/lucidubuntu-10-04-high-resolution-plymouth-virtual-terminal-for-atinvidia-cards-with-proprietaryrestricted-driver/

Screen resolution, VGA and HDMI on Sony Vaio VPCS11E7E with Ubuntu 10.04 (no bed of roses)

Italiano | English

UPDATE (08-30-2010): To bring TTYs back and set boot resolution, click here.

Have you succeeded in installing Ubuntu 10.04 on your Vaio? Good, now let’s deal with screen resolution and shit like that (OMG, not my politeness day!). I know that installing NVIDIA proprietary driver and manually modifying xorg.conf works, but I don’t know if NVIDIA drivers are really required. If you wish to keep nouveau drivers read this post and use it your way.

Install NVIDIA drivers by SystemAdministrationHardware drivers and when you’re asked to reboot don’t do it.

Open a terminal and type

gksu gedit /etc/X11/xorg.conf

and add lines 14 and 15 to that file, like this

Section "Screen"
Identifier      "Default Screen"
DefaultDepth    24
EndSection

Section "Module"
Load    "glx"
EndSection

Section "Device"
Identifier      "Default Device"
Driver  "nvidia"
Option  "NoLogo"        "True"
Option  "ConnectedMonitor"      "DFP-0,DFP-1,CRT"
Option  "CustomEDID" "DFP-0: /proc/acpi/video/IGPU/LCD0/EDID"
EndSection

What do those lines do?

  1. line: configures 3 possible monitors (DFP-0, DFP-1 e CRT).
  2. line: tells your graphic chip your monitor specifications (DFP-0) from an EDID generated by ACPI.

Now you can reboot and enjoy your VGA and HDMI (the latter sadly without sound at the moment).

Side effects

You will lose you virtual consoles. Well, actually they are still there, but when you switch to one of them your screen will shut down. You could try, CTRL+ALT+F1 (CTRL+ALT+F7 brings your desktop back). This is really annoying, but my eyes tell me it’s better than a wrong resolution.

This is energy saving on Linux 😀

Nothing I’m aware of at the moment. This guide continues here.

Sources: obviously vaio-f11-linux, can’t remember the others.

Sound and microphone on Sony Vaio VPCS11E7E with Ubuntu 10.04

Italiano | English

UPDATE (08-20-2010): Locking the package is no more required.

What do you need

I strongly advise you to at least do all the security updates before starting, so that you will have the latest Lucid kernel.

In a terminal type:

sudo apt-get build-dep --no-install-recommends linux-backports-modules-alsa-$(uname -r)
sudo apt-get install fakeroot
mkdir mic ; cd mic

in order to download the libraries and the programs needed to compile. As you can see I also created a mic directory, so it will be easier to get rid of the no more useful files.

Compile and install

apt-get source linux-backports-modules-alsa-$(uname -r)
wget -c http://vaio-f11-linux.googlecode.com/files/vaio-f11-mic-linein-linux-2.6.35.patch
cd linux-backports-modules-2.6.32-2.6.32/
patch updates/alsa-driver/alsa-kernel/pci/hda/patch_realtek.c ../vaio-f11-mic-linein-linux-2.6.35.patch

all in the same terminal as above! So we downloaded the sources, the patch and we applied the patch to the sources.

Add a line like this to your debian/changelog:

so that apt will think that our version is newer than the one in the repos.

We are ready to compile:

fakeroot debian/rules binary flavours="generic"

since I don’t know how to not compile linux-backports-modules-wireless, it will take a couple of minutes.

When it’s done:

sudo dpkg -i ../linux-backports-modules-alsa-2.6.32-*
rm -rf ../../mic

Finished?

Almost.

  1. You may want to lock the current package in order to prevent apt to replace ti with the one from Canonical. Using Synaptic browse to the package you just installed and then PackageLock Version. (Useless it seems)
  2. Ubuntu kernels are made so that you will have to redo this howto at every major release of Lucid kernel. If you haven’t understand what I just said, «yesterday it was working» is a good clue anyway.

Source: http://code.google.com/p/vaio-f11-linux/wiki/EnableMicrophone

Install Ubuntu 10.04 on Sony Vaio VPCS11E7E

Italiano | English

First things first, let’s install Ubuntu. Insert your CD, DVD, whatever and at this screen

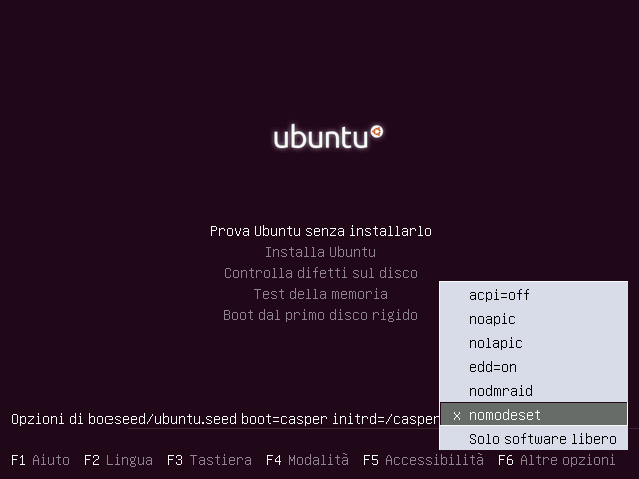
press any key to get the old language choosing menu. Select your language and press F6. In this menu select nomodeset, as in the following image.

Tell Ubuntu to start in live desktop mode (first option) and start the installer as you usually do. Your screen resolution will be just wrong, but it doesn’t matter right now.

Once installation has completed, do not restart your PC, you must first disable KMS on your brand new Ubuntu. In a terminal run

sudo -s
mount /dev/[partizione_dove_avete_installato_ubuntu] /mnt
echo options nouveau modeset=0 > /mnt/etc/modprobe.d/nouveau-kms.conf

Now you can reboot and your Ubuntu will start correctly. Except for the resolution, but this will be the topic of the next howto.

Source: https://wiki.ubuntu.com/X/KernelModeSetting

Audio e microfono su Sony Vaio VPCS11E7E con Ubuntu 10.04

Italiano | English

AGGIORNATO (20-08-2010): Non è più necessario bloccare inutilmente il pacchetto.

Ho scoperto che ci si può riuscire anche senza cambiare kernel, quindi la vecchia guida è ufficialmente obsoleta.

Prerequisiti

Mio consiglio spassionato è di effettuare tutti gli aggiornamenti (o almeno tutti quelli di sicurezza), in modo da avere installata l’ultima versione del kernel 2.6.32 fornito da Ubuntu per Lucid.

Aprite un terminale e digitate:

sudo apt-get build-dep --no-install-recommends linux-backports-modules-alsa-$(uname -r)
sudo apt-get install fakeroot
mkdir mic ; cd mic

in modo da scaricare le librerie e i programmi necessari alla compilazione. Come potete vedere vi ho fatto creare una cartella di nome mic, in modo che venga più semplice cancellare la roba inutile una volta finita l’installazione.

Compilazione e installazione

apt-get source linux-backports-modules-alsa-$(uname -r)
wget -c http://vaio-f11-linux.googlecode.com/files/vaio-f11-mic-linein-linux-2.6.35.patch
cd linux-backports-modules-2.6.32-2.6.32/
patch updates/alsa-driver/alsa-kernel/pci/hda/patch_realtek.c ../vaio-f11-mic-linein-linux-2.6.35.patch

da inserire sempre nel terminale di prima, mi raccomando! Scaricati i sorgenti, la patch e infine applicata la patch ai sorgenti.

Modificate il numero di versione aggiungendo al file debian/changelog una riga come la seguente:
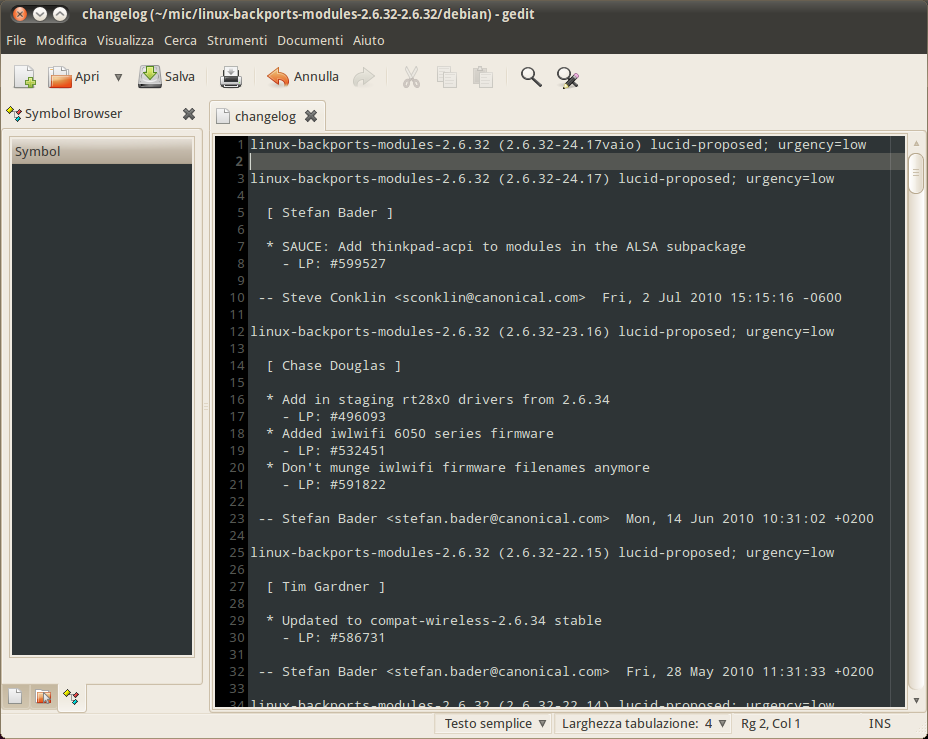
in questo modo apt considererà la nostra versione più recente di quella fornita da Ubuntu.

Potete ora procedere alla compilazione

fakeroot debian/rules binary flavours="generic"

la quale avrà bisogno di qualche minuto, poiché non ho trovato il modo di non fargli compilare anche i wireless backported (un aiutino?).

Appena avrà finito

sudo dpkg -i ../linux-backports-modules-alsa-2.6.32-*
rm -rf ../../mic

per installare il pacchetto e cancellare le cose che non ci serviranno più.

Note finali

  1. Per evitare che apt sostituisca ciò che abbiamo appena installato con la versione di Ubuntu, è una buona idea aprire Synaptic, andare fino al nostro pacchetto e selezionare PacchettoBlocca Versione. (Inutile, pare)
  2. Per come sono concepiti i kernel sotto Ubuntu, ad ogni major release del kernel di Lucid e ad ogni aggiornamento upstream dei backports dovrete eseguire nuovamente questi comandi. Se non avete capito quello che ho appena detto, il «prima andava e ora no» è comunque un buon sintomo.

Fonte: http://code.google.com/p/vaio-f11-linux/wiki/EnableMicrophone

Audio su Sony Vaio VPCS11E7E (niente microfono, forse)

Obsoleto (o ultima risorsa). Versione aggiornata qui.

Molto bene, almeno questa volta faremo in fretta. Aprite un terminale e digitate

sudo apt-get install linux-backports-modules-alsa-lucid-generic


Chiudete il terminale e riavviate. Fatto

Nota: se avete in programma di installare un kernel più recente (tipo il 2.6.35, leggere sotto) questo passaggio è inutile.

Due paroline sul microfono

Attualmente il microfono non va neppure con kernel 2.6.35 e alsa 1.0.23, ma non ho abbastanza esperienza/voglia per mettermi a patchare alla cieca pezzi di kernel/alsa. C’è però un wiki su Google Code che da quando ho comprato questo PC mi sta riempiendo di soddisfazioni e, guarda caso, parla proprio di microfoni:

http://code.google.com/p/vaio-f11-linux/wiki/EnableMicrophone

Sì, so leggere, c’è scritto vaio-f11, ma contando che parlano sempre di schede audio ALC275 come la nostra ci sono buone probabilità che la patch funzioni anche sul nostro modello. Se volete potete buttarvi a patchare, ma tenete conto di due cose:

  1. la patch non è compatibile con Ubuntu 10.04 (a meno che non installiate il kernel 2.6.35);
  2. la patch sarà inclusa nel kernel 2.6.36, quindi se non sapete neppure dove sta di casa gcc lasciate perdere e aspettate che esca il prossimo kernel.

Se invece siete all’altezza mi fareste un gran favore a dirmi qualcosa nei commenti in modo che possa aggiornare la guida anche sul mio blog (e naturalmente prendermi il merito di tutto).

Fonte: http://www.thechosenbyte.com/2010/03/13/la-voglia-e-poca-tuttavia/